Getting Started with Cinnamon Testing
Now that you've set up your Cinnamon environment, it's time to start writing some tests! This page provides an overview of important concepts in Cinnamon testing and an example of a basic Cinnamon test.
The first step in writing a Cinnamon test is identifying particular pages and objects in the user interface that you need to test. Cinnamon tests the functionality of elements on individual pages, so knowing which page and which elements you want to test is important.
After you decide which page you're testing, you need to design and create a PageObject class to represent the page. A PageObject is an interface between your custom page and your test classes that provides a set of methods or services to manipulate UI components.
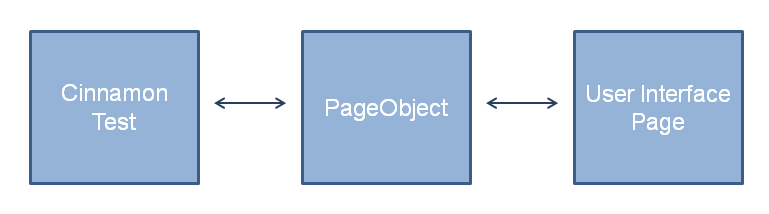
Every UI page needs an associated PageObject but a single PageObject can be used in multiple tests, so you'll never need to duplicate the code that controls the UI. Additionally, if the UI changes, you only need to edit the PageObject class instead of every test class that's associated with that page in the UI. See the Selenium PageObject reference and PageObject in Cinnamon for more details.
Let's set up an example to get a better idea of how Cinnamon works. You'll first need to create a custom Visualforce page. If you need help with this step, see the Visualforce topic page in the Salesforce developer library. Use the following markup for this example:
<apex:page standardController="Account">
<apex:form >
    <apex:pageBlock title="Edit Account for {!$User.FirstName}">
        <apex:pageMessages />
        <apex:pageBlockButtons >
            <apex:commandButton id="saveBtn" value="Save"
                                   action="{!save}"/>
        </apex:pageBlockButtons>
        <apex:pageBlockSection >
            <apex:pageBlockSectionItem >
                <apex:outputLabel value="Account Name" for="name"/>
                <apex:inputField id="name" value="{!account.name}"/>
            </apex:pageBlockSectionItem>
            <apex:pageBlockSectionItem >
                <apex:outputLabel value="Account Site" for="site"/>
                <apex:inputField id="site" value="{!account.site}"/>
            </apex:pageBlockSectionItem>
        </apex:pageBlockSection>
    </apex:pageBlock>
</apex:form>
</apex:page>

For this page, you might want to test whether entering a value in the Site field and then clicking Save actually changes the site value for that Account object. To do this, you need to use PageObjects.
To create a PageObject for our example page, you need to create an Apex class.
- Log in to your Salesforce organization and select the Cinnamon app from the AppPicker.
- Click Setup.
- Go to Develop > Apex Classes.
- Click New.
- Copy and paste the following source code into the text area:
public class EditAccountPageObject extends cinnamon.PageObject { cinnamon.WebElement saveBtn, accountName, site, ratings; public override void initializePageObject() { saveBtn = getElement(new cinnamon.VisualforceLocator('apex:inputField', 'saveBtn')); accountName = getElement(new cinnamon.VisualforceLocator('apex:inputField', 'name')); site = getElement(new cinnamon.VisualforceLocator('apex:inputField', 'site')); ratings = getElement(new cinnamon.VisualforceLocator('apex:inputField', 'rating')); } public EditAccountPageObject clickSave() { saveBtn.click(); selenium.waitForPageToLoad('3000'); return this; } public EditAccountPageObject typeAccountSite(String data) { site.sendKeys(data); clickSave(); return this; } } - Click Save.
cinnamon.PageObject class that provides methods for interacting with a page's UI. There are fields for each element on the page. The values of these fields are assigned in the initializePageObject() method by calling getElement() and using Cinnamon's built-in VisualforceLocator to determine the position of the elements on your page. The remaining methods in this class define different actions that a user might perform such as clickSave() and typeAccountSite(). Notice that typeAccountSite() includes a call to clickSave, so you don't have to worry about calling the save operation manually in your tests. The return type of the method must simulate the page that the user sees after performing that action. For this example, any action that a user performs keeps the user on the Account's Edit page, so all of the methods return an EditAccountPageObject.
Now we're ready to get started with the test. There are three stages in every Cinnamon test.
- Setup: During setup, you create a test fixture that can be used throughout all phases of testing. For our example, we'll need to set up a test Account object.
- Testing: The testing stage is when you actually manipulate the UI and make sure that it's performing as intended.
- Tear down: The final stage of testing is when the objects that you created throughout your tests are removed and your environment is returned to its original state.
Here is the full source code for a test for the custom Account Edit page:
public class TestEditAccountPage extends cinnamon.BaseTest {

    public override void setup(cinnamon.Context context) {
        Account acc = new Account();
        acc.name = 'Account' + System.currentTimeMillis();
        insert acc;
        context.put('accId', acc.Id);
    }

    public override String getStartingPath(cinnamon.Context context) {
        return '/apex/editAccount?id=' + (String) context.get('accId');
    }

    public override void test(cinnamon.Context context) {
        String accId = (String) context.get('accId');

        EditAccountPageObject page = (EditAccountPageObject) context.getPageObject(EditAccountPageObject.class);

        page.typeAccountSite('San Francisco');

        Account a = [select name, site, rating from Account where Id = :accId];
        System.assert(a != null);
        System.assertEquals(a.site, 'San Francisco');
    }

    public override void tearDown(cinnamon.Context context) {
        List<ID> Ids = new List<ID>();
        Ids.add((String) context.get('accId'));
        Database.delete(Ids);
    }
}
- Setup
public class TestEditAccountPage extends cinnamon.BaseTest { public override void setup (cinnamon.Context context) { Account acc = new Account(); acc.name = 'Account' + System.currentTimeMillis(); insert acc; context.put('accId', acc.Id); }- The first thing to notice is that, like in the
EditAccountPageObjectclass, you need to extendcinnamon.BaseTest. Take a look at the method signature forsetup(). It overrides thesetup()method from theBaseTestclass, and has a parameter of typeContext. The Context object carries your test objects throughout the testing phase by storing them in a map. - Inside the method, you create an Account object, assign it a name, and then insert it into your organization's database.
- The final piece of the setup is to put your new account into the context map so that it can be used later in the test.
After your test fixture is setup, the Cinnamon testing framework obtains the URL for the UI page that you're testing using the
getStartingPath()method.public override String getStartingPath(cinnamon.Context context) { return '/apex/editAccount?id=' + (String) context.get('accId'); } - The first thing to notice is that, like in the
- Testing
public override void test(cinnamon.Context context) {
    String accId = (String) context.get('accId');
    EditAccountPageObject page = (EditAccountPageObject) context.getPageObject(EditAccountPageObject.class);
This is a long method, so let's take a breather. Again, this method overrides the
test()method in theBaseTestclass and takes aContextobject as a parameter. Inside the method, you retrieve the AccountIdfrom the context map and cast it to a String because theget()method returns a generic object. Now you'll need to use theEditAccountPageObjectthat you created earlier, instantiating it by callingcontext.getPageObject(). Note that theinitializePageObject()method is called automatically by the Cinnamon framework. Let's keep moving.page.typeAccountSite('San Francisco');Finally, you call methods from your PageObject to execute the UI's services. Here, we are changing the Account's site to "San Francisco," a change that is saved by the call to
clickSave()in thetypeAccountSite()method in your PageObject class. Remember that any action that you want to perform in the UI needs to be defined in the associated PageObject class. Now it's time to check whether performing these actions worked the way that you expected.Account a = [SELECT name, site rating FROM Account WHERE Id = :accId]; System.assert(a !=null); System.assertEquals(a.site, 'San Francisco'); }You first need to create an Account by retrieving the Account that you created during setup from the database by using the Account's
Ids. The last twoassert()lines ensure that this new object isn't null and that its site field equals "San Francisco." That concludes the testing stage for this example. Easy! - Tear down
public override void tearDown(cinnamon.Context context) {
    List<ID> Ids = new List<ID>();
    Ids.add((String) context.get('accId'));
    Database.delete(Ids);
}
You've made it to the last step of writing a Cinnamon test. Here, you simply create a list to store all of the objects that you created during the setup and testing stages (again, by getting them from the context map) and then delete the objects in the list from the database.
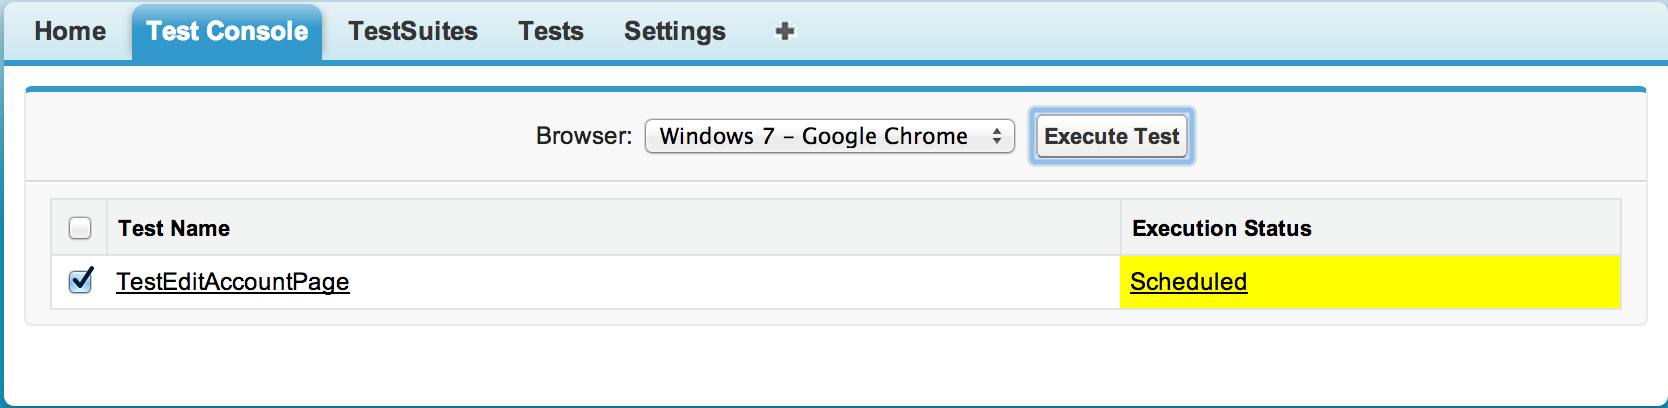
- To execute your new test, all you need to do is navigate to the Test Console, then select the checkbox next to TestEditAccountPage, and select the browser and operating system combination on which you want your tests to run.
- Finally, click Execute Tests. You'll see that the execution status immediately changes to "Scheduled."
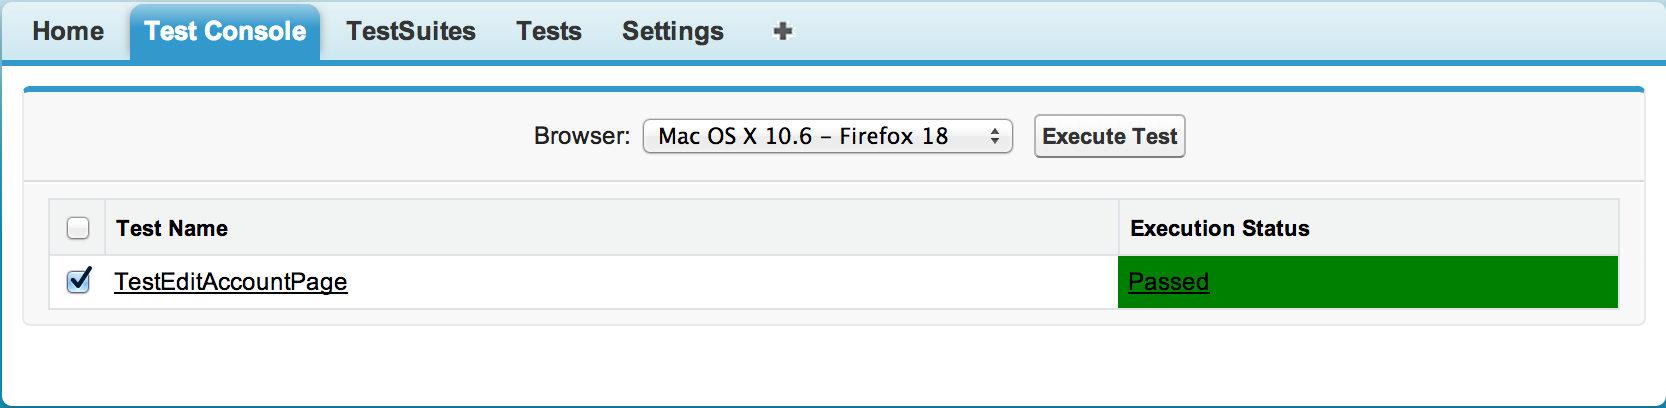
The status changes to Running, and terminates with a status of Passed, Failed, or Error.
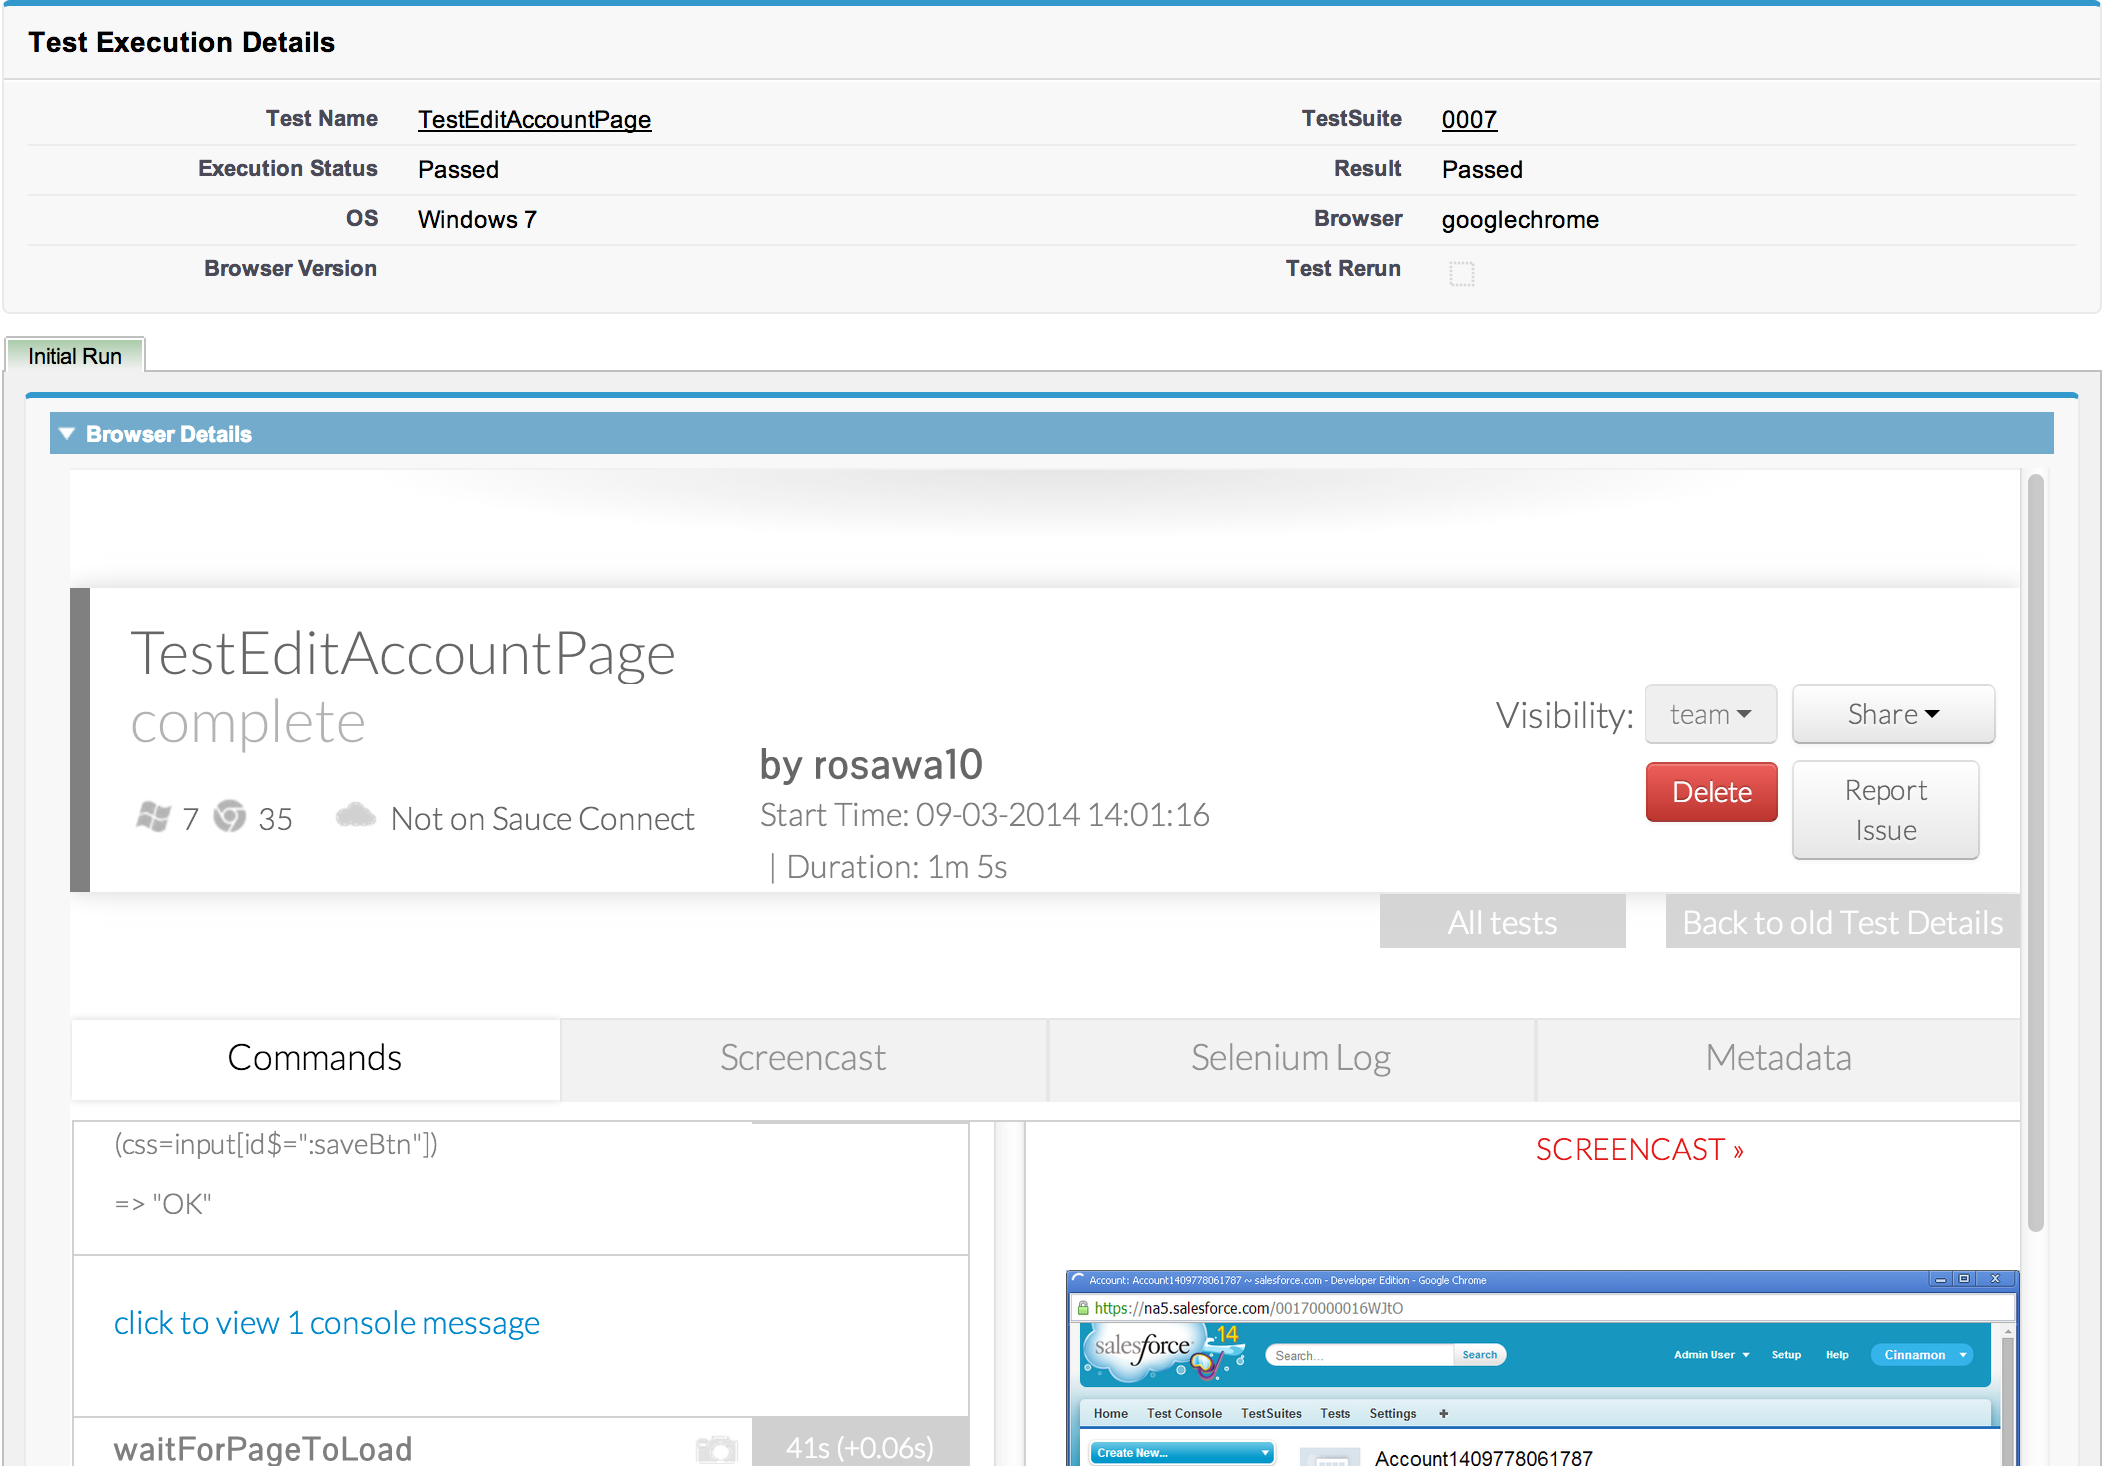
You can view details about the test by clicking on its name. At the bottom of the details page under Test Executions, you can see information about individual executions of the test.
You've successfully written and executed your first Cinnamon test! This was a simple example, but Cinnamon provides functionality for more complex testing. See the Cinnamon Documentation to see what else you can do.